Are you itching to get out and do some work in your garden? So are we! We’ve recently been discussing early spring garden and landscape maintenance tips from our resident gardening expert, Mary Palmer Dargan. Here are some more of her tips to give your green thumb some more exercise this week:
I love gardening in a raised bed as it improves drainage. Raised beds improve drainage because they raise the level of soil above the surrounding ground. Other benefits of raised beds include less soil compaction, easier weed control, warmer soil temperature in spring, ease of access, reduced soil erosion and beauty.
These raised beds at the Chicago Botanic Garden are featured in the “Gardening is Therapy” chapter of my book Lifelong Landscape Design.
I’m potting up my dahlias I pulled last winter and am rather appalled at how shriveled up the roots are… You walk a fine line on saving tubers and lots of unnecessary work if they are not viable. I’ll report on this later!
Plant asparagus crowns and radishes and transplant cold-season plants such as broccoli, cabbage and kale indoors. I have way too many baby plants, so I am juicing my leftovers and making microgreen salads. It is most nutritious!
Wait until six weeks before planting time for most vegetables to start them indoors… Otherwise they get very leggy and transplant poorly unless grown with bottom heat like forcing lights. Christmas tree lights are an excellent option for bottom heat! Just remember to be patient throughout the process – Your patience will be rewarded with a thriving garden this summer.
Lawns need fertilization if they are cool-season grasses. I am an organic gardener, so I highly recommend taking a soil sample and finding what your soil actually needs instead of just putting on the gas with fertilizer. You can obtain a soil sample for free from most local cooperative extension offices.
Dargan Landscape Architects
Also, think twice about enjoying a mixed lawn and turn a blind eye to “weeds.” I think once mown, a green lawn is a green lawn no matter its tapestry makeup! Plus, you’ll save on buying weed killer.
What else are you doing in your garden now that we’re experiencing a few warmer days? Let us know by leaving a comment.
If you’re ready to discuss a master plan or tune up for your landscape, contact Dargan Landscape Architects. We can help you formulate a plan that will bring your dreams to life as we heal the Earth one garden at a time!
After months of bitter cold and snow this winter, spring is finally here and it’s time to show your garden some love. However, be sure you’re ready for a roller coaster of a season. One day the sap is rising and the next it falls for a quick drop below the freeze line, but you can still crank up your gardening chores.
Dargan Landscape Architects
So, get out your mud boots, put on your gardening gloves and head outdoors to get to work. Bring with you these early spring garden and landscape maintenance tips straight from Mary Palmer Dargan, our resident gardening expert:
I like to cut back my hydrangeas, both the tardiva and limelight varieties, waiting until after the last frost to cut the blue macrocarpa varieties and grape vines. You’ll have beautiful blooms later this season!
Now is the time to plant nuts and berries, such as blueberries, strawberries and berries on canes. Just the thought of fresh picked berries from the garden is enough to keep you warm until summer! For established vines and fruit trees, it’s best to wait until the worst weather has passed before pruning. Fertilize fruit trees as soon as possible after the ground thaws.
Watch for seed starting opportunities and send off your orders. Spring planting will result in a bountiful harvest to enjoy this summer. Plan to grow at least one new vegetable this year! I am growing leafy Chinese types. What do you have in mind?
Hugh and I plant our vegetables in whiskey barrels at our Highcote home, as shown in this photo from Lifelong Landscape Design. We rotate what we plant in each barrel from year to year.
Break up garden beds and turn the cover crop. Be careful not to double dig as this disrupts the delicate mycorrhizae system that makes a healthy soil. Mycorrhizal fungi are valuable natural allies that assist with the biological processes of gardens, such as helping plants take up more phosphorous, as well as accumulating carbon in the soil and improving its clumping ability.
That should be enough to keep you busy this week, but be sure to watch for more of Mary Palmer’s early spring garden and landscape maintenance tips on our blog in the near future.
For help designing a master plan or tune-up for your garden or landscape, contact Dargan Landscape Architects.
The hub is not only an important part of your landscape’s master plan, but it’s also instrumental in creating a visual connection between your home and your surrounding property. As mentioned in the previous post, the hub is where activity originates on your land. This focal point is typically the home in most cases.
Dargan Landscape Architects
With the home as the hub, you’ll want to be intentional about the design of your landscape on and around it. The first way to establish the home as the hub is to invest in the design of your approach and arrival sequence, which is where guests get the first glimpse of your home. Next, you’ll want to focus on hub identity and architectural composure, vistas and captured views.
Making a home appear, well, at home in the landscape can be difficult given challenges that are often present with the topography, as well as environmental issues. However, landscaping solutions can make the most of these problems by creating balance and restoring order. Adding retaining walls to level out a sloped site, for example, is just one of the many tactics that can be used to create a more balanced look.
Here are some additional considerations for understanding the anatomy of the hub:
When it comes to hub identity, is the hub approached from the side or straight on? While straight-on is a more formal layout, it can present challenges on an uneven site.
Is the ground level across the front of the building or does it slope to the side? Sloping land requires retaining walls to make a flat area at the base of the house so that plantings don’t angle downhill.
Does high or low ground around the house cause drainage problems? Solutions for drainage problems are not always attractive, so if you have them, you may want to consult a landscape designer for a more aesthetically pleasing fix.
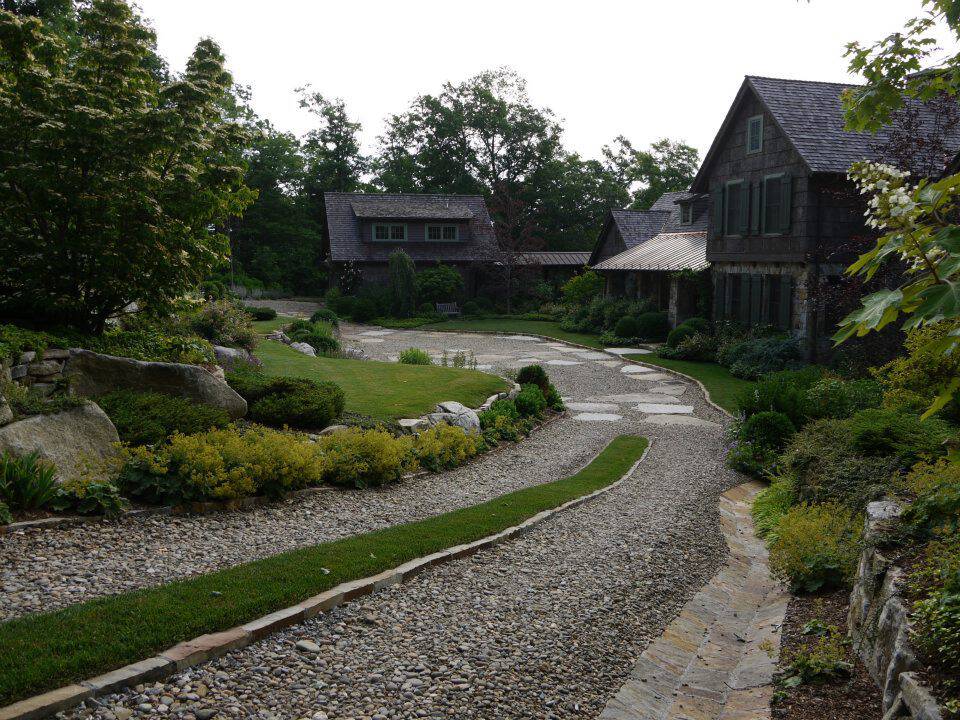
An example of using your home as a powerful hub can be seen in this house, designed by Norman Askins of Atlanta. It sits firmly on flat land and is enhanced by the simple curve of the drive and cherry trees. Foundation plantings are minimized to emphasize the sweep of house and lawn.
Home Designed by Norman Askins of Atlanta Photo via Timeless Landscape Design
Part of what makes landscapes unique is the “genius loci”, a Latin phrase we use in landscape design meaning “spirit of place.” Identifying or describing the genius loci of your property is essential to creating a timeless landscape that best suits you.
The concept of genius loci dates back to 18th century England, when it was first described by poet, classical scholar and gardener Alexander Pope. In a place and time when it was most fashionable to recreate French and Italian gardens, Pope advocated for a landscape style that considered the inherent qualities of a place first and foremost. In other words, let nature be your guide.
The easiest way to understand genius loci is to tap into your senses. Touch, taste, smell, sight and sound all contribute to spirit of place. Considering these aspects should help with more concrete parts of the decision-making process involved in any landscaping project such as Dargan Landscape Architect’s Four-Part Master Plan.
To identify your genius loci, observe your land and the surrounding area and what is naturally occurring there. Here are some things to consider:
What is the local topography?
What kinds of plants are already growing and doing well?
What are the prominent natural features–a creek, pasture, etc.?
What are some of the naturally occurring raw materials and color palettes?
What kinds of rock, stone and earth abound?
What kind of wildlife inhabit the area?
Are there any subtle sounds or smells?
How does the sunlight hit your property throughout the day?
What is your home’s architectural scale and style?
What building materials are used on the house?
What are the house colors, forms and textures?
What is the neighborhood like, and are there any vernacular building styles?
Does the neighborhood have lots of trees, hills, or other features?
Are the houses modern or traditional?
Are there straight or winding streets?
For more information about the concept of genius loci, order a copy of Mary Palmer’s book “Timeless Landscape Design.”
Recently, we began a discussion on the landscape design process that we follow here at Dargan Landscape Architects. Our landscape design process consists of 12 steps that are intended to help homeowners achieve a beautiful landscape through meticulous planning. Our previous discussion covered the first six steps in the process, which include making a survey; developing a base plan; taking an inventory of the site; analyzing the site; developing a program wish list; and creating a functional diagram. Let’s continue the discussion today with a look at the final six steps of our landscape design process.
7. Develop a concept diagram. The concept diagram plays off of the functional diagram, putting more details and ideas into the vision for your landscape design.
8. Sketch alternative plans. You may discover through creating your diagrams that some ideas you had hoped for your new landscape won’t be ideal based on site conditions, space and other factors. A sketch of alternative plans gives you a “plan B” to fall back on.
9. Verify field conditions. Verifying your field conditions is a way to test your landscape design on the site before your plan and drawings are finalized. This can be done by taking measurements of the space you’re working in and marking it accordingly. By verifying the field conditions you’ll avoid costly construction mistakes.
10. Create a master landscape plan. The master plan shows the locations of the project and boundaries of the area to be designed. It also includes features to be built like walkways, buildings and other structures, as well as flower beds, focal points and more. Your master plan should include the approach and arrival sequence, hub, perimeter and passages to destinations.
11. Make implementation drawings. Making implementation drawings is one of the final parts of the landscape design process. These final drawings will guide the contractors and designers that will build and install your new landscape.
12. Get it built! Now it’s time to get started on your property’s new look. Once you’ve signed an agreement with your contractor and set the date, construction can begin.
For more information on our landscape design process, purchase a copy of Mary Palmer Dargan’s book, Timeless Landscape Design. If you would like to discuss a master plan or a tune-up for your property, contact Dargan Landscape Architects for more information.